Introduction
This tutorial picks up where Hello, Cinder: Section 1 left off. If you recall, the previous section walked us through the creation of a simple particle engine. We are going to modify that particle engine and turn it into a flocking simulation. We will be starting with the code from Section 1: Chapter 5 but we are going to strip out a few things we no longer need (like the kitty source image and all references to Perlin noise, and for now, the repulsion force code). If you are unfamiliar with Cinder and have not gone through Section 1 of the 'Hello, Cinder' tour, we would recommend starting there.
Note: This tutorial builds on the work of two luminaries in the field: Craig Reynolds, the father of boids and author of Steering Behaviors for Autonomous Characters, and Iain Couzin, head of the Collective Animal Behavior lab at Princeton.
Camera
In the previous tour, we only concerned ourselves with a 2D view of the Particles. They existed in their flatland, oblivious to the third dimension. It is time to throw an extra dimension at our Particles to see how they will behave in a 3D space. The best place to start in our new 3D project is the Cinder Camera class.
First, the include:
Then in the main class, we create a CameraPersp.
The perspective Camera (as opposed to the orthographic Camera) is the standard way to move around in a virtual space. To describe our perspective Camera lens, we will use the setPerspective() method. Also note we prefix our member variables with the letter 'm' versus local variables which have no prefix. This is simply to make the code more readable later on. When you see variables with the 'm' prefix, you instantly know you are dealing with a member variable.
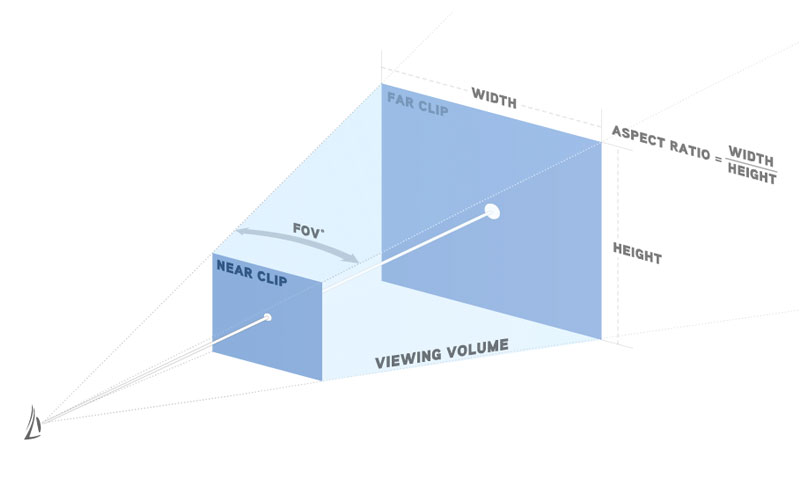
The camera's setPerspective() method takes four parameters. First is the horizontal Field Of View. The smaller the number, the tighter the viewing frustum. (I usually choose a number between 60.0 and 90.0. There is some debate about the FOV of the human eye. It is estimated to be around 60 but the eye is very accommodating so this number varies. Also, if you take into account peripheral vision and the fact we have two eyes, the estimate would be as high as 140 to 180.)
The second parameter is the aspect ratio of the application window. Cinder provides the getWindowAspectRatio() convenience method for getting the aspect ratio. If you prefer, you can calculate this yourself by taking the window width and dividing it by the window height.
The third and fourth parameters are for the clipping planes. The easiest way to think of it is this: Don't draw anything that is closer than the near clipping plane and dont draw anything that is further away than the far clipping plane. Since we are just looking at a bunch of particles that exist in a relatively confined area, we will choose values for the clipping plane that will accommodate our particles without also paying attention to a bunch of extra space where particles will likely never go. No reason to look all the way to infinity if nothing ever wanders more than 500 units from the camera.
Here is our camera setup explaining the setPerspective() parameters. Everything in the viewing volume will be shown in the application window.
Now that we have defined our camera, all that is left is for us to tell it where to be and where to look. This is definitely easier than it sounds but it will take a few lines to get it all squared away. First we need to create a Vec3fs for each of the three vectors the CameraPersp is expecting.
The first vector, called mEye, represents the position of the Camera. The second vector, called mCenter, represents the point in space towards which the Camera is pointed. Finally, the oddest vector of the bunch is called mUp. This is a normalized vector which tells the Camera which direction it should use as the up orientation. Generally, though not without debate, the up axis corresponds with the y-axis. Some people prefer to use the z-axis as the up axis but we have found the former to be more intuitive. With this setup, we have a camera that is looking at the origin along the z-axis from a distance of 500.0 with an up orientation corresponding to the y-axis.
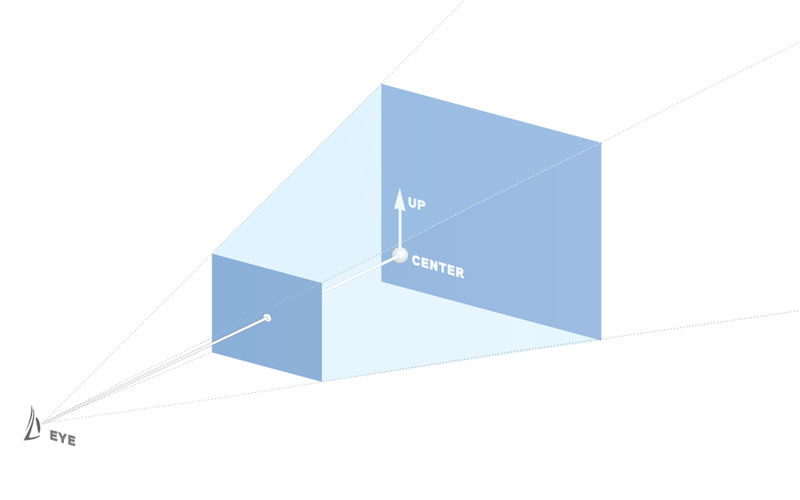
The following two lines do all the hard work. You provide it with the three Vec3fs (eye, center, and up) and sit back and enjoy your new perspective view. You will have a camera at mEye which is pointed towards mCenter with an up orientation of mUp, and this camera will have a FOV of 75, the proper aspect ratio for the application window, and will clip any content closer than 5.0 and further away than 2000.0.
The setMatrices() method takes the parameters we established with our camera and then translates them into a ModelView and a Perspective matrix and sets them to be the current matrices in OpenGL. Now that we have our virtual camera, it is time to give it some user control. This can be a tricky thing to set up but lucky for us, we have the Params class to make it incredibly simple.
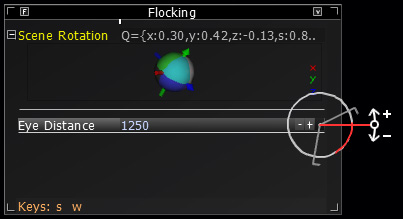
PARAMS
Hopefully by now you have played around with the Params class built around the AntTweakBar by Antisphere. Params allows for an easy way to adjust variables in runtime with a minimal amount of setup. It really is surprisingly easy.
After the include, make a new cinder::params::InterfaceGl InterfaceGl called mParams. It has three initial parameters: title, size and color (optional).
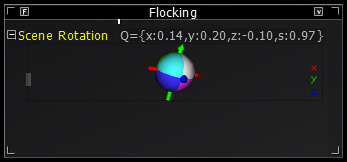
All we need now is to give it a reference of the variable we wish to control at runtime. In our case, we want a whole new variable that we can use to rotate the scene. We are going to invoke the power of the mighty Quaternion. Don't be scared, you don't need to know the math behind the quaternion to enjoy some of the benefits.
Then in setup(), after we initialize mParams, we add the following line.
With this line, now have the ability to control mSceneRotation in runtime using the mParams window. When adding a new tweakable parameter to your InterfaceGl instance, the addParam() method is expecting the memory address of your variable so it know where to look for its value. That's what the C++ Address-of operator (&) does. It grabs the memory address of a variable. Since we are asking mParams to give us control of a quaternion, it automatically does the right thing and gives us an arc-ball.
Now we just need to add one more line below the code we used to set up the virtual camera.
When you click and drag in the params arc-ball miniwindow, the entire scene will rotate. Cinder does have an Arcball class which is explained in the ArcballDemo project in the samples folder. If you want more control over the arc-ball, that would be the place to start.
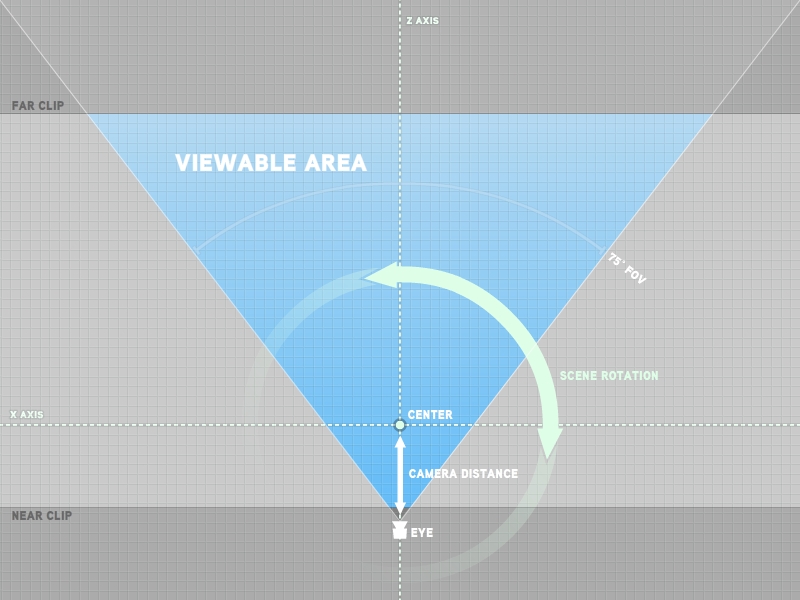
Since we are already here, we can go ahead and add the mCameraDistance to the params window. It works just like the Quatf we already added but we are going to customize it a bit using the third parameter which takes a string. We can define the minimum and maximum allowed values, the keys for increasing and decreasing the value, and the amount by which the value is adjusted per key press.
Now we can zoom into our scene by pressing the 'w' key and zoom out with the 's' key. We can also control it using the rotoslider which you can access by clicking the circle-and-dot icon that appears when you rollover the 'Eye Distance' item. You may have noticed we did not do any KeyEvent bindings on KeyDown() like we have in the past. It is all handled by Params. And best of all, it takes only one line of code to add a new variable.
FLOCKING
As we mentioned at the beginning of this chapter, much of the code is copied over from the 'Hello, Cinder' tour. In that 5 chapter tutorial, we created a particle engine which created space-filling particles that would spread out using a repulsive force. For now, we have removed the repulsive force but we will add it back in the next chapter.
When you run the Chapter 1 source code, you will see a bunch of Particles appear near the center of the screen and spread out into the 3D environment. To get comfortable with the application, we recommend dragging the Params' Scene Rotation arcball around so you can see how the camera control works. You can also adjust the camera distance using either the 'w' and 's' keys, or you can click the corresponding buttons in the Params window.
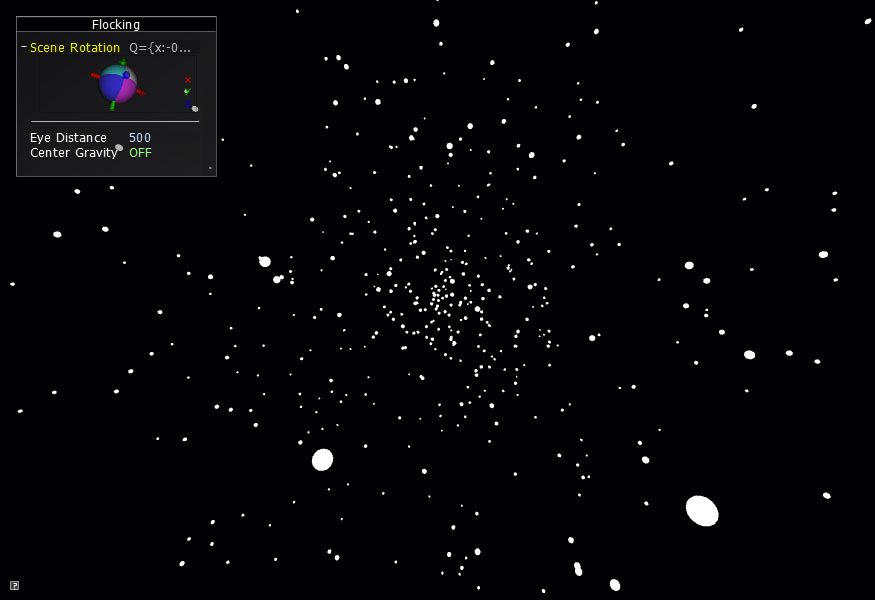
One thing that happens with flocking simulations in an unbounded 3D space is they objects tend to wander off screen and sometimes never return. There are a few different ways to handle this problem. You could create a bounding box which would prevent the objects from leaving but can result in frustrating bunching in the corners and along the edges. You could have the camera follow the densest bunch of objects but if they split into groups, the camera will have to choose one to follow and the others will be forgotten. The solution we will be using for this tutorial is to have the objects gravitate towards the middle of the screen. It is a subtle pulling force that isn't strong enough to upset the system, but it will help draw the wanderers back in.
To see this force in action, press the 'g' key to toggle the (g)ravitational force. Slowly, the Particles outside of the maximum allowed distance will pull back into the center of the screen. To create this force, we tell each Particle to check its distance to the center of the screen. If this distance is greater than our distance threshold, pull the Particle back towards the center. The further away the Particle wanders, the stronger the pull back to the center. This will ensure we don't lose any Particles. Since we are also using a distance threshold and pull strength, we can make the effect as subtle as we'd like.
That concludes Chapter 1. In Flocking Chapter 2, we will explain the first rule of flocking: Separation.